Thursday, 5 December 2013


Fashion and Styling- Location
Location
We planned to choose the back of Ravenbourne university as our location because the surrounding portrayed the image that we was going for, the edgy feel, with the different textures and colours.


Fashion and Styling- Our Choice of clothing
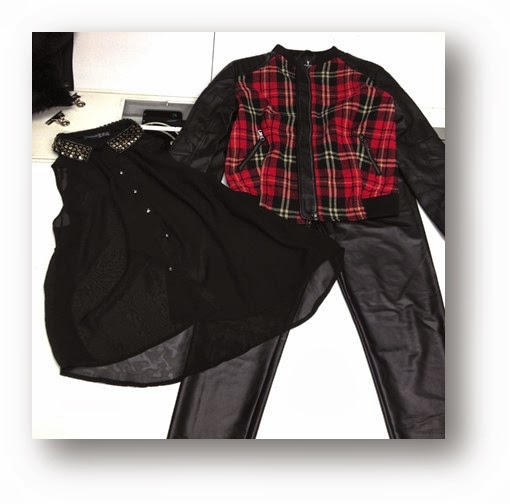
We pulled together key pieces focusing on
what we had on our mood board
Raquel
Leather
top, tartan leggings, black blazer w/ leather sleeves, bowler hat, platform
boots.

Kanisha
Leather
trousers, black sheer top, tartan panel bomber jacket, platform heels.
Sherlaine
Black
jeans, mesh top, grey t-shirt, plaid shirt, leather jacket, platform boots.

Fashion and Styling- Inspiring looks
Moodboard of inspiration ideas

Music
inspired us, we looked at a number of artists that
resembled the urban
image, such as
Rihanna
and Kanye West and also
looked at their
collections
We
were looking at the clothing brands that these particular artists
wear, designers such as Trapstar, KTZ, Dopechef, and Balmain.
We began picking out key pieces these artists have been currently wearing this season which is leather, black and tartan, which was consistent throughout their image, and this inspired our dominant trend to also be leather, black and tartan.
We decided to keep the clothing simple and stylish with a little edge.


My 2week project Fashion and Styling
INTRODUCTION
TO FASHION STYLING
•The aim for this project is to explore and understand the role of the stylist
•In a group, style our own photo-shoot with a professional photographer
•Develop an understanding of the role of the fashion stylist and produce a presentation showing the stages of research and development
•Each member in the group has take in consideration all the roles in the creative team as well as being the stylist.


Creatin a product out of tissue- part2
My second idea focused on the function of tissue. I came up with this idea to research as well as asking a number of people how and why the use tissue. A key problem that I acknowledge was the difficulties that driver face while driving. As a person that drive, I find it hard to get myself a tissue whilst concern testing on the road. From that I came up with the concept of creating a tissue dispenser for a car. As I began to research the different tissue dispenser all ready out there. I realised that my idea had been all ready created. However as I looked further into it I came to the conclusion that those that were all ready created could be dramatically improved. As I found that drivers that had used these existing products, still found it difficult to get tissue whilst trying to concentrate on the road. The key problem these existing products faced is that the position they were placed where inconvenient for drivers. For example, some were made to be placed onto the sun visor, having here could be distracting and a obstruction for the driver. So I came up with the idea of creating a tissue dispenser that could be transferable product, that could be moved into any position within a car that any driver felt comfortable using it, with out feel at risk of loosing control of the car. One of which was on the car door, as week as near the steering wheel so it easy to reach.

Creating a function for tissue
The two main ideas that I narrowed it down to was creating tissue into a object as well as giving the tissue a function. So I created a cushion made out of tissue. I then came to the conclusion that I needed to adapt my idea further as it needed to be a suitable product that could be used in the real world. I realised that a cushion made out of tissue was not suitable for a household as it would easily break. Therefor I had to research a number of soft materials, such as wool and cotton. As I developed my cushion I shortly realised that my idea is a common product that is frequently used around the world. I decided to think about my object and how I could adapt it into making it unique. So I went back and looked at my notes about why/how people use tissue in their everyday life. From that I realised that the main use of tissue was for absorbing liquid. For example whipping spillages as well as blowing your nose. So I can up with a concept which gave me the idea of converting my cushion into a cushion tissue dispenser. The idea behind came from I scenario I put together. A sick individual some who has a bad flu, who can't leave bed or the sofa. Their nose may run frequently, however they find it a hassle to keep getting out of bed/sofa to look for tissue. Therefor having a cushion tissue dispenser would make their life easier. So they no longer need 2 leave their bed/sofa to find tissue. They can just pull one out of their cushion.


Creating a product from/inspired by tissue
For this project I was given tissue as a object, from that I had to come up with a use for it or a object formed from it. I found this particularly challenging as I found it hard to come up with ideas to transform the tissue into a product. I started by sketch the tissue as well as creating different shapes from the tissue, such as twisting it and scrunching it up. I then began to research the uses of tissue, through both books and Google. I then decided to ask a number of people what they used tissue for. From that I came up with a number of ideas to how I could make tissue a useful product for people.


Sunday, 3 November 2013
3DD Pathway- Creating A Use For My Object
Once asked to create a use for my object I soon discovered that this would be a hard task as I did not want my object to be a obvious choice in comparison to what it may look like. After coming up with a number of different ideas I narrowed it down to three which was a table, sofa and a chair. My final choice was the chair as I thought that by transforming my object into a chair I could put my own touch to the design of the chair by adding twirling legs as well as keeping the hoops as a arm rest. As well as adding hoops for the back support and adding a cross cross effect on the back rest and the legs.
3DD Pathway- Small But Loud
This week I have chosen my pathway in which is 3DD. For my first project I had to create 10 different objects that required no use. So I came up with my own creations with out over thinking about it as it did not require any use or functions. So I started adding different materials together and just went with the flow until my object looked complete. I used a number of different materials, from polyester, to cardboard and plastic ect. As is tatted to create my objects one thing I started to notice that each object I made had a little resemblance of objects that already existed, perhaps this is because I wanted to give some kind of use to some objects although I was requested not to. However some objects I made completely was my own creation with no use as I just threw together materials. Having said that I knew that once asked to create a use for my objects I would find this very hard.


I then had to pick my favourite object of the ten I created. Once I decided what object that I wanted to adapt, I began creation different functions for it such as turning it into a chair, as well as turning it into a cd rack and a is rack. refining my idea became easier once I started to research a concept of which was things that are small but loud. I looked at a number of different products such as door bells, alarms, sirens, whistles ect. I then looked at birds, as the are small animals that make a lot of noise. I decided to create my object into a docking system of which the speakers resemble wings of a bird.


I then had to pick my favourite object of the ten I created. Once I decided what object that I wanted to adapt, I began creation different functions for it such as turning it into a chair, as well as turning it into a cd rack and a is rack. refining my idea became easier once I started to research a concept of which was things that are small but loud. I looked at a number of different products such as door bells, alarms, sirens, whistles ect. I then looked at birds, as the are small animals that make a lot of noise. I decided to create my object into a docking system of which the speakers resemble wings of a bird.
Small But Loud Presentation
Wednesday, 23 October 2013
Reflection
Through out the last few weeks my foundation course has taught me a lot in such little time. It has helped me realise that my future starts here as well as how to go about presenting my work. I have now realsied in order to go forward in my career, I have to focus in producing a number of ideas because my first intial idea might be very vage or common or obvious and a good idea takes a number of ideas combined together. It aslo taught me to work faster in creating my ideas, while a person spends hours and hours on one sketch and idea another person is creating 20 different ideas in that space of time and has many to choose from. This course has also opened my eyes to a number of different equpiment, technology and courses that I didnt know before. It has helped me decide what I want to do in the future which is product design. Before the couse has started I am already putting togther ideas of different products that I could create in the future. It has made me make sure all my ideas is put down on paper, whether its a sketch or a photograph.
Graphic- Poster Of My Future Exhibition
This Poster reflects where I want to be in 20 years and where I think my career will go. It portrays my ambition and where I think my hard work will get me in life. I was given a week to finalise this mini project, throughout that week I had to put together a number of different ideas to come up with the final layout of my poster. As I have a huge interest I fashion I decided to base my poster and exhibition around fashion. The idea behind the poster was to promote the exhibition as well as promoting my clothing line and my clothes. My brand name is I AM KAY in bold capital latters that will be in the name tags of each garmet, Thsi is the reason why it dominates the image. I chose the colours black and red because they are two dominating and powerful colours that contrast eachothere.
![]()


Graphics
Through my foundation course I have learnt that I would have to woprk fast in the future. Rather than spending hours and hours on sketchs, I would have to become less delicate with my sketches and spend less time as by doing this I will create more images and create more ideas to work with. My challege was to ceate a number of imageses useing me different senses. For example one of the tasks set was to create a image of the person sitting infront of me drawn with my weaker handd which is my left hand. I also had to draw another person with my eyes closed. I was only given 5-10 minuets to draw each person. Having done this task I learnt to rely on my intuition and to be less delicte and concern with my sketches.


Another task I did was create an unusual abstract face using collarge from magazines that had images of celebrities faces. I enjoyed doing this as I did not have a original plan or any idea of what I wanted the outcome to look like. I just went with the flow and let the piece speak for itslef.


Another task I did was create an unusual abstract face using collarge from magazines that had images of celebrities faces. I enjoyed doing this as I did not have a original plan or any idea of what I wanted the outcome to look like. I just went with the flow and let the piece speak for itslef.

Subscribe to:
Posts (Atom)